Windows Sandbox

One of the new features of the Windows 10 May 2019 Update is the Windows Sandbox . It is a simple virtualization tool that can be used, for example, to test software that we do not want to install on the operating system itself, or to open a potentially infected file without risking damage to the computer.
It is not a replacement for VirtualBox or similar complex tools. Windows Sandbox can create one isolated copy of Windows 10 itself, the state of which cannot be saved. The tool also has its advantages - very simple usage.
Every time you turn on Windows Sandbox, you should get into a completely clean environment that looks similar to a clean system installation. Therefore, no data or changes to the system are left after the Sandbox is turned off. Therefore, the new feature will not be very suitable for applications you use daily. However, it is a good solution for cases when you need to test an application and are unsure of the origin of the installation file.
System Requirements
Windows Sandbox is available in Windows 10 Pro and Enterprise editions, but not in Home edition. A 64-bit version of the system is required. In addition, a minimum of 4 GB of RAM (8 GB recommended), a minimum of 1 GB of disk space, a dual-core processor (at least four cores recommended), and hardware virtualization enabled are required.
Turn on hardware virtualization
First, we should verify that hardware virtualization is on. Run a command prompt and type systeminfo.exe.
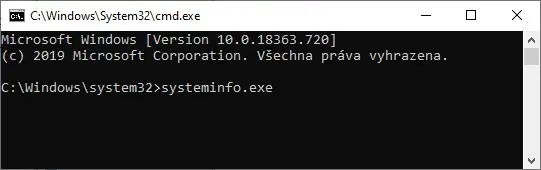 systeminfo.exe
At the end of the list, find Hyper-V Requirements under Virtualization Enabled in Firmware. If we see the value No, then virtualization is not enabled.
 Hyper-V Requirements
In this case we have to switch to BIOS and enable virtualization. The specific steps may vary depending on the BIOS version of our device.
You can verify that the virtualization is on by running systeminfo.exe again. Now we see the value of Virtualization Enabled in Firmware.
 Hyper-V Virtualization Enabled
Activate and run Windows Sandbox
Windows Sandbox still needs to be enabled in your system. Go to Control Panel and in the Programs and Features section, select Turn Windows features on or off. Check the Windows Sandbox option in Window and restart the system after confirmation.

Now we find a program called Windows Sandbox in the system, which we run normally (we will need administrator privileges). It may take a while to start - after all, a virtual copy of the entire system is created.
Virtualized system control
The system will start in a separate window. Most of the add-on applications are not present, but the basic ones, including the Microsoft Edge web browser, can be found there. Antivirus protection is disabled by default, but can be enabled as needed. Internet connection works by default.
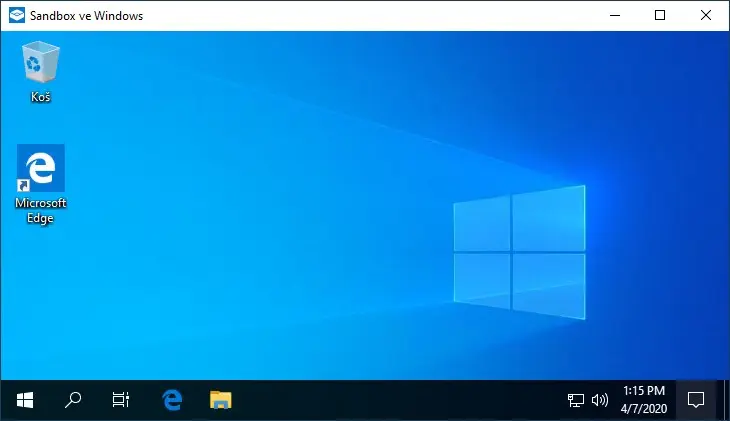 Windows Sandbox Window
Files and directories cannot be dragged and dropped between real and virtualized systems, but can be copied using the traditional Copy/Paste system. We don't directly see the contents of a real hard drive from a virtualized system. After booting up the system and downloading or copying the installation files or other content, we can start testing as if we were in the real system.
Configuration file for Windows Sandbox
The behavior of the virtualized system can be influenced by the configuration file. We create a text document, write the desired virtualized system settings and save it with the .wsb extension. Double-click the created configuration file to start the virtualized system with the required properties.
<Configuration>
  <MappedFolders>
    <MappedFolder>
      <HostFolder>C:\temp</HostFolder>
      <ReadOnly>true</ReadOnly>
    </MappedFolder>
  </MappedFolders>
</Configuration>
The configuration file shown will map a folder named temp and make it available in a virtualized system.