The Best Django Extensions and Plugins
This article isn’t intended for those just getting their feet wet in Django. Instead, it’s tailored for advanced Django developers who are looking to push the boundaries of what’s commonly considered feasible in web development. We’ll dive deep into both popular and esoteric extensions, and yes, I promise this will include code examples, real-world applications, and even the tiniest nuances you need to be aware of.
Django Allauth: Elevating User Authentication to an Art Form
In essence, Django Allauth is to user authentication what a Swiss Army knife is to outdoor survival — multi-faceted, reliable, and exceptionally adaptable. It provides an all-in-one solution for account management, social authentication, and third-party OAuth logins, to name just a few. The charm of Django Allauth lies in its versatility. It fits equally well into a startup MVP or an enterprise-level application dealing with complex authentication scenarios.
pip install django-allauth
Add allauth and allauth.account to your INSTALLED_APPS in your Django settings.py file:
# settings.py

INSTALLED_APPS = [
    # ...
    'allauth',
    'allauth.account',
    # ...
]
Finally, include allauth.urls in your project's urls.py:
# urls.py

from django.urls import path, include

urlpatterns = [
    # ...
    path('accounts/', include('allauth.urls')),
    # ...
]
Code Snippets and Examples
Let’s look at a real-world application — integrating social login via Twitter. First, add Twitter to your INSTALLED_APPS:
# settings.py

INSTALLED_APPS = [
    # ...
    'allauth.socialaccount.providers.twitter',
    # ...
]
Then, create a new Twitter app to get your API keys and add them to your settings:
# settings.py

SOCIALACCOUNT_PROVIDERS = {
    'twitter': {
        'APP': {
            'client_id': 'YOUR_CLIENT_ID',
            'secret': 'YOUR_SECRET_KEY',
        }
    }
}
Finally, use the login template tag in your HTML:
{% load socialaccount %}
<a href="{% provider_login_url 'twitter' %}">Login with Twitter</a>
And there you have it — Twitter authentication smoothly integrated into your Django app, thanks to Django Allauth.
Django Debug Toolbar
At its core, the Django Debug Toolbar serves as a real-time dashboard, providing immediate insights into the inner workings of your Django application. It allows you to scrutinize SQL queries, inspect template usage, and dissect HTTP headers, among other things. Moreover, its extensibility means that it can be adapted to monitor bespoke elements of your project that are critical to its performance. Simply put, this toolbar is the lens through which you can scrutinize the micro and macro aspects of your application’s performance.
First, install the package via pip:
pip install django-debug-toolbar
Second, add debug_toolbar to your INSTALLED_APPS within your Django settings.py:
# settings.py

INSTALLED_APPS = [
    # ...
    'debug_toolbar',
    # ...
]
Lastly, include the Debug Toolbar middleware and add its URL patterns to your urls.py:
# settings.py

MIDDLEWARE = [
    # ...
    'debug_toolbar.middleware.DebugToolbarMiddleware',
    # ...
]

# urls.py

from django.urls import path, include

urlpatterns = [
    # ...
    path('__debug__/', include('debug_toolbar.urls')),
    # ...
]
Once the toolbar is installed and the view is loaded, you can immediately see:
- How many SQL queries were executed
- How much time was taken for each SQL query
- The total time for the HTTP request
- and more ...
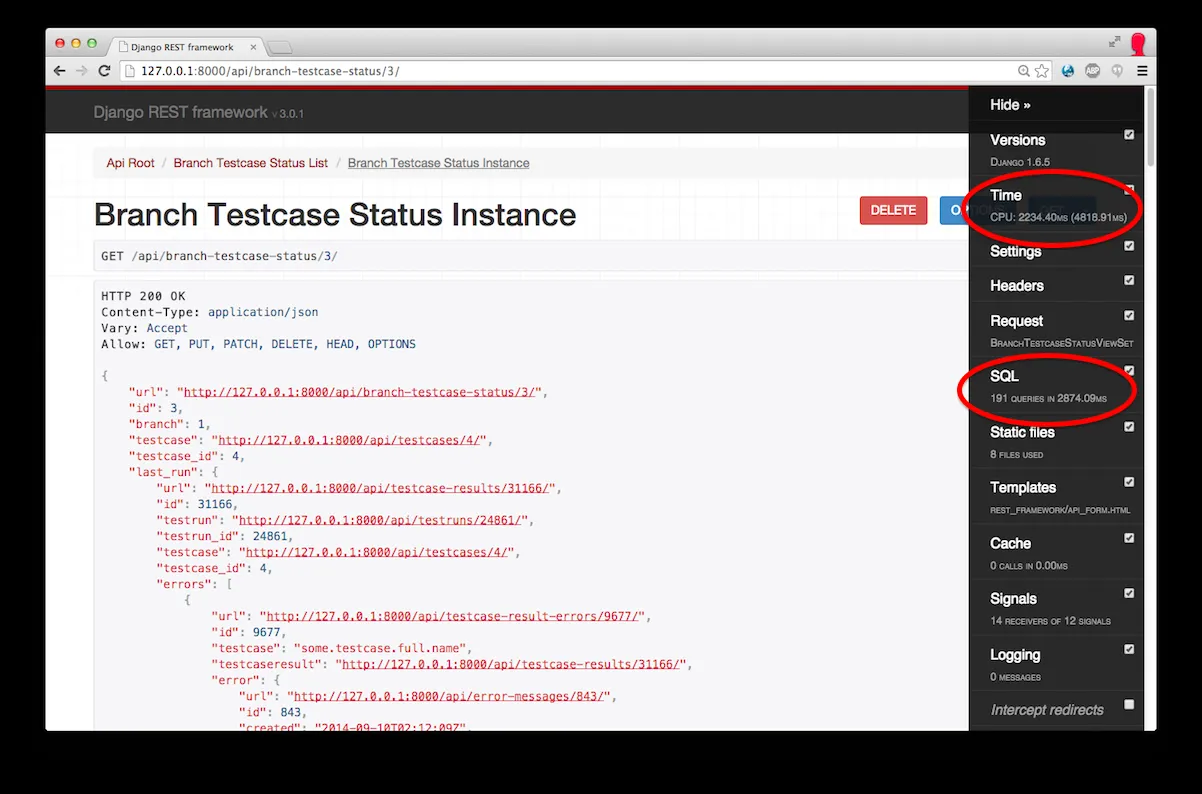 django debug toolbar
Django FSM (Finite State Machine)
The notion of states in computing isn’t a new one. It traces its roots to the rudimentary beginnings of computer science, influenced by mathematical models like automata theory. In any complex system — be it an operating system, a distributed network, or a robust web application — states matter. Just as Windows wouldn’t function effectively without proper state management, neither would your Django application. Enter Django FSM (Finite State Machine), an indispensable tool that helps in managing the states of your Django models elegantly and efficiently.
The Django FSM extension brings the concept of a finite state machine into your Django projects. Think of a finite state machine as a map of the different statuses or states an object can have and the rules or transitions for moving between these states. It provides a way to define these states and transitions directly in your models, making your code cleaner, more maintainable, and easier to understand. It’s like the Registry Editor for your Django application, but instead of tweaking your system settings, you’re structuring your application’s logic in a way that’s intuitive and aligned with best practices.
First, make sure to install the package via pip:
pip install django-fsm
There’s no need to add it to INSTALLED_APPS, it's a plug-and-play package. However, you'll need to import it in the files where you intend to use it.
Code Snippets and Examples
To demonstrate its capabilities, let’s consider an example of an e-commerce application where an order can have multiple states like Pending, Shipped, Delivered, etc.
Defining States in your Model
# models.py

from django.db import models
from django_fsm import FSMField, transition

class Order(models.Model):
    state = FSMField(default='pending')

    @transition(field=state, source='pending', target='shipped')
    def ship(self):
        pass

    @transition(field=state, source='shipped', target='delivered')
    def deliver(self):
        pass
Transitioning Between States
# views.py or wherever your business logic resides

def ship_order(order_id):
    order = Order.objects.get(pk=order_id)
    order.ship()
    order.save()
The above snippets showcase how to define states (pending, shipped, delivered) and transitions (ship, deliver). By calling the ship() or deliver() methods and saving the model, you effectively change the state of the object.
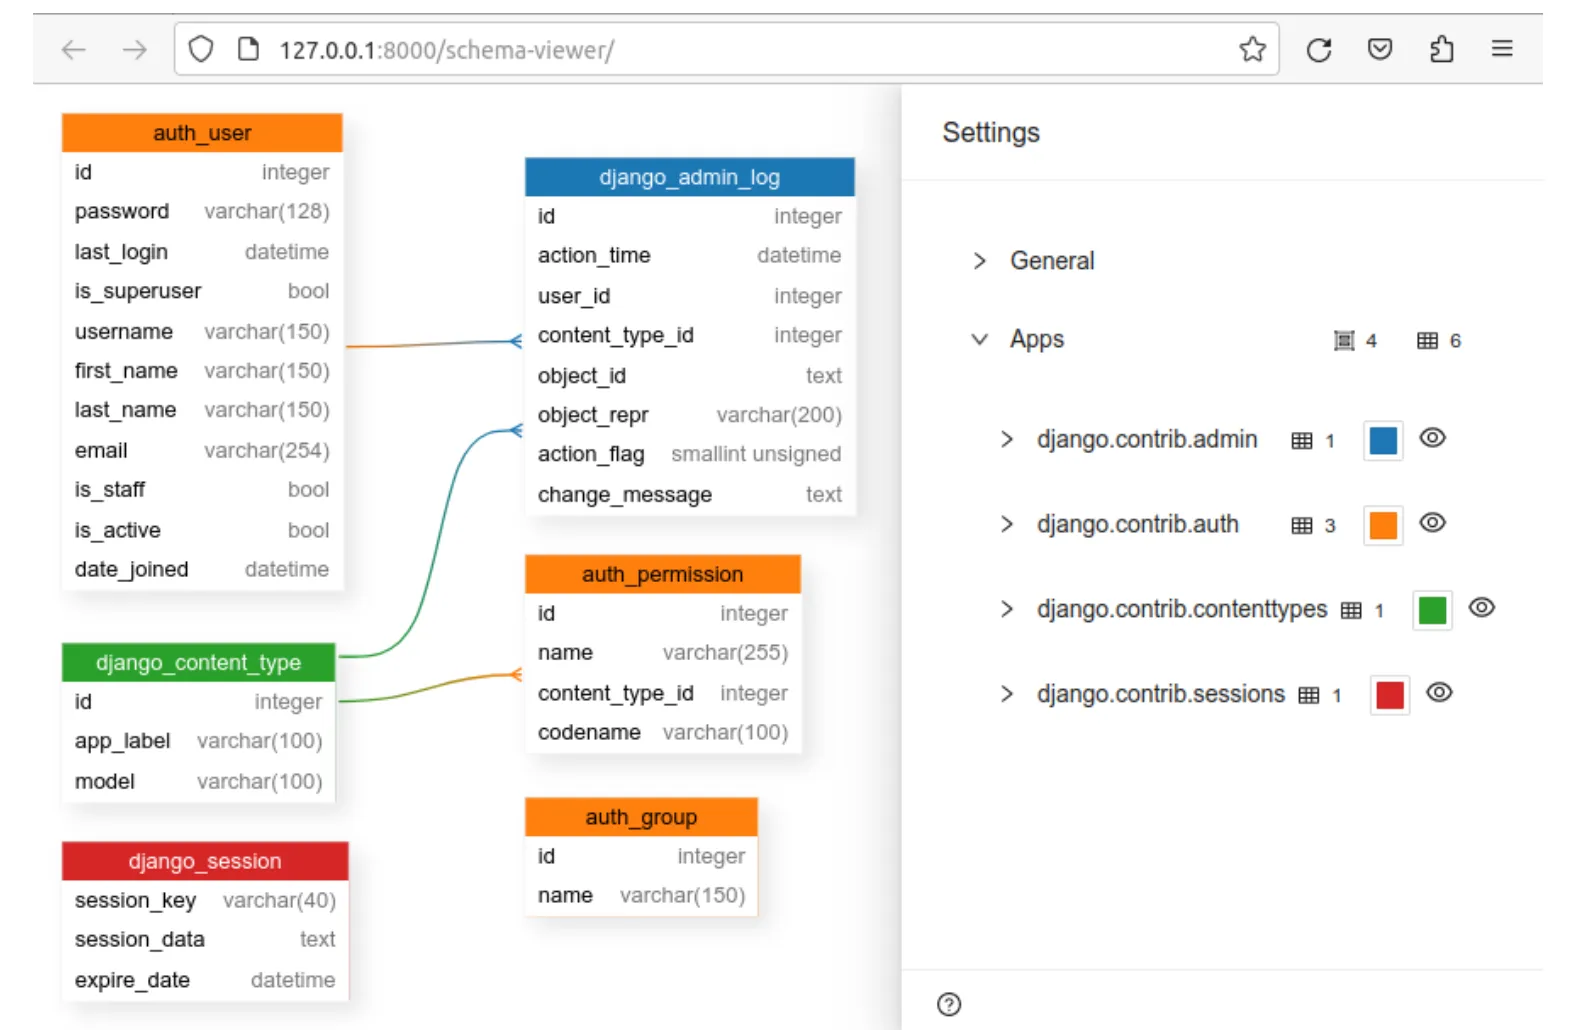
Django Models Schemas
Django-schema-viewer is an open-source Python package designed to help Django developers visualize and navigate their database models with ease. By automatically generating graphical representations of Django models and their relationships, this tool simplifies the process of understanding complex database structures, making it an essential asset for any Django project.
One of the primary features of django-schema-viewer is its ability to generate graphical representations of Django models and their relationships automatically. This feature allows developers to quickly grasp the structure of the database and identify any potential issues or areas for optimization.
django-schema-viewer supports a wide range of databases, including:
- PostgresSQL, MySQL, SQLite, Oracle
install:
pip install django-schema-viewer
Adding to Django projects: After installing django-schema-viewer, add it to your project's INSTALLED_APPS setting in the settings.py file:
INSTALLED_APPS = [
    # ...
    'schema_viewer',
    # ...
]
Setting up URLs: To integrate django-schema-viewer make sure to include the following URL patterns in your project's urls.py file:
from django.contrib import admin
from django.urls import path, include

urlpatterns = [
    # ...
    path('admin/', admin.site.urls),
    path('schema/', include('schema_viewer.urls')),
    # ...
]
Configuring Optional Settings: In the settings.py file of your Django project, you can further customize the behavior of django-schema-viewer using optional settings. Two particularly useful optional settings are apps and exclude.
- apps
- This setting allows you to specify a list of Django apps that should be included in the generated schema. By default, django-schema-viewer includes all apps in your project. However, you can limit the displayed apps by providing a list of the apps you want to include, like this:
SCHEMA_VIEWER = { 'apps': [ 'contenttypes', 'my_app', ], } -
In this example, only the contenttypes and my_app apps will be included in the generated schema.
- exclude
- This setting enables you to exclude specific models from the generated schema. You can specify the models to exclude on a per-app basis. For instance:
SCHEMA_VIEWER = {
    'exclude': {
        'auth': ['User'],
        'my_app': ['SomeModel'],
    },
}
In this example, the User model from the auth app and the SomeModel model from the my_app app will be excluded from the generated schema.
Run the following command to start the Django development server:
python manage.py runserver
Once the server is running, open your web browser and enter the following URL: http://127.0.0.1:8000/schema-viewer/ (Replace 127.0.0.1:8000 with your server's address and port if necessary.)
After accessing the URL, you should see the django-schema-viewer interface, which displays a graphical representation of your Django models and their relationships.